Pilot Wave | MIDI Effect Sequencer | Owner's Manual
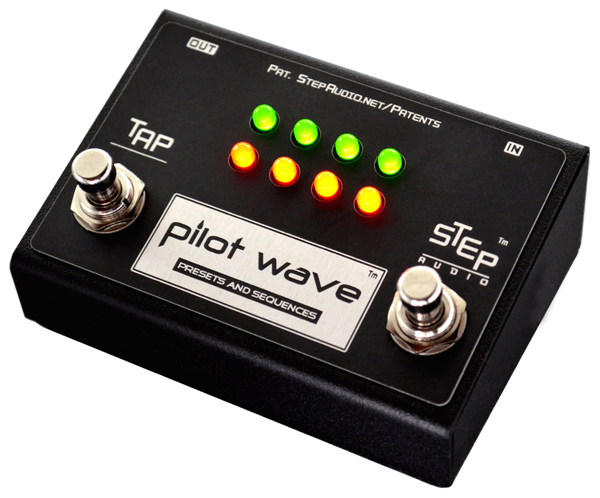
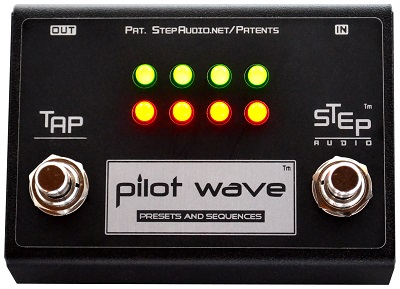
Controls
TAP Button
STEP Button
Visual Indicators
LEDs
Optional STATUS Display
How to Use Pilot Wave
Selecting Presets Using Pilot Wave
Selecting Presets Using MIDI
Modes of Operation
2-Step™
1-Step
Tap Tempo
One-Shot
MIDI Clock
Rebound
Rebound | Saw Up
Rebound | Saw Down
Split™
MIDI Control Change
Creating and Editing Presets
Loading Stored Presets
Preset Number
Number of Program Changes to Send
SequenceType
Number of Steps
Sequence Measures
Block Incoming Clock?
Use Existing Tempo?
Tempo (bpm)
Sequence Preview
Playback Speed (Seconds)
Scrub Sequence
Number of Control Changes to Send
CC [x] to Send
Controller Number [0-127]
Device-Specific Menus
Same Value for all Steps?
Sliders
Send Preset
Saving Presets
Copying Presets
Downloading Presets
Programming Tips
Globals
Pilot Wave MIDI Channel
Max. Preset
Power-up Light Show?
Cue Loop Setting
Pass Keyboard Data?
Enable Tap Auto Play?
Block all MIDI Clock?
Incoming CC Step Controller [1-31, 33-127]
Send Tap-Pulse CCs?
Send Globals
Factory Reset
Specifications
Power Requirements
MIDI Phantom Power
MIDI Running Status
Pilot Wave Dimensions
![]()
Pilot Wave™ multiplies the sonic potential of MIDI controllable effects, including Meris, Chase Bliss, Strymon, Eventide, Line 6 and more!
Pilot Wave creates virtual presets for your devices.
Pilot Wave also lets you sequence effect parameters, unlocking the hidden power in your pedals.
Step Audio's patented technology transforms your effect pedals into dynamic instruments by giving you realtime control of every knob with the push of a button!
Pilot Wave controls any MIDI device that accepts MIDI Program Changes and/or Control Changes.
Pilot Wave provides up to ten simultaneous MIDI Control Change sequences to dynamically adjust effect parameters.
Pilot Wave also outputs up to five MIDI Program Changes to switch your effect to the desired program before starting sequences.
If you use Meris, Chase Bliss, or Strymon pedals, use our Quick Start page to configure your device.
Loading Quick Start Presets
Note: Our Videos page also has links for configuring Meris, and Large and Small Strymon pedals.
Many other brands and devices are listed in our Device-Specific menus on the Preset Programmer.
Even if your device is not listed, you can send MIDI Control Changes by selecting particular Controller Numbers. This is required with some brands that do not pre-assign controller numbers to particular parameters, including Eventide and Source Audio.
Note: Some devices need to be configured to respond to MIDI data. Consult your manual for more information.
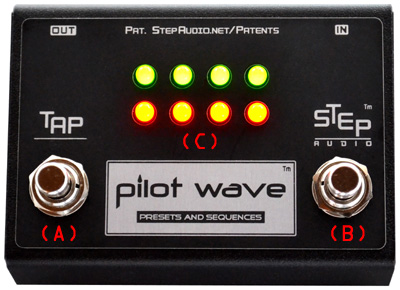
The Step Button performs different functions, depending on whether you are selecting Presets, or controlling seqeunces.
The Step Button performs different functions, depending on whether you are selecting Presets, or controlling seqeunces.
Pilot Wave's eight (8) LEDs indicate sequence steps and preset numbers as follows:
When a single LED is lit, the top row indicates 1-4 and the bottom row 5-8. When a single LED is off, the top row indicates 9-12 and the bottom row 13-16.
The LEDs also show a "smile" when preset or globals data is successully received:
.:.
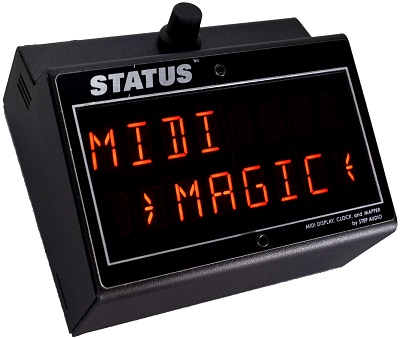 Optional STATUS Display
Use Step Audio's STATUS MIDI Display to show custom preset names when selecting Pilot Wave presets.
To use this feature, STATUS must be set to the same MIDI Channel as Pilot Wave.
While presets are being selected manually, STATUS flashes the name of the pending program. When the program is selected, the flashing stops.
When Pilot Wave presets are selected with an external MIDI controller, the name is displayed immediately.
Note: Whenever a preset is selected, Pilot Wave always sends a program change with the current preset number on its own MIDI channel. This is in addition to any other program changes being sent with a preset.
Tip: Switch between STATUS Display Modes by sending Control Change (CC) 89 on its MIDI Receive Channel using these values:
1 = Progam Name Display
2 = BPM Display
3 = Tempo Superflash
4 = Data Display | SYS MSG
Pilot Wave works by itself and does not require an external MIDI controller.
If you want to control Pilot Wave with an external MIDI controller, connect a standard 5-pin MIDI cable from the device sending MIDI data to Pilot Wave's IN Jack.
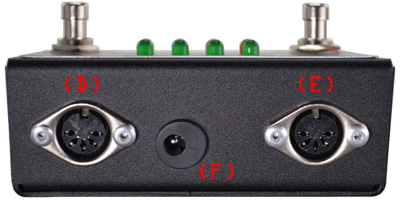
Connect the appropriate MIDI cable from Pilot Wave's OUT Jack to the MIDI IN jack on your effect.
Plug in a separate or isolated 9 volt, 2.1mm, 200mA minimum, tip negative ("BOSS" style) DC Power supply into the DC Power Jack.
*** Never power Pilot Wave with a "daisy chained" power supply ***
.:.
PIlot Wave comes with three different MIDI cables to connect directly to most MIDI effects. Connect Pilot Wave's MIDI OUT to the MIDI Input on your pedal using the appropriate cable.
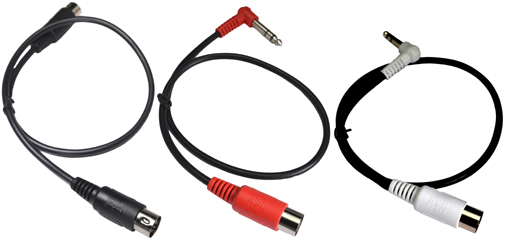
Black is a standard MIDI cable and works with devices that use a round 5-pin MIDI connector, including Strymon TimeLine, Strymon Mobius, Strymon BigSky, Strymon Volante, Dr. Scientist Atmosphere, Eventide H9, Eventide PitchFactor, Eventide TimeFactor, Eventide ModFactor, Eventide Space, Hologram Dream Sequence, WMD Geiger Counter Pro, GFI Systems Specular Tempus, Line 6 Helix Floor, Line 6 Helix Control, Line 6 Helix Rack, Line 6 Helix LT, Line 6 HX Effects, Line 6 HX Stomp, Line 6 M13 StompBox Modeler, Line 6 M5 StompBox Modeler, Line 6 M9 StompBox Modeler, Line 6 POD HD500X/HD PRO X, Moog MF-105M MIDI MuRF, Moog MF-104M Analog Delay, Moog MF-108M Cluster Flux, and many others.
Red is a MIDI to TRS, tip-active cable that works with all Meris pedals as well as Strymon Riverside, Strymon Sunset, Strymon Iridium, Strymon Volante, Empress Echosystem, Empress Phaser, Empress Reverb, Empress Tremolo2, and Bondi Art Van Delay.
Note: Meris and some Strymon pedals require you to configure the EXP jack as a MIDI Input. See the Quick Start page for instructions.
White is a MIDI to TRS, ring-active cable that works with all Chase Bliss pedals.
You may also connect the Black 5-pin MIDI cable to a conversion box such as the Meris MIDI I/O, Chase Bliss MIDIbox, or Empress MIDIbox. This will also allow Pilot Wave to control multiple MIDI devices simultaneously.
Note: To simultaneously control multiple pedals, use a MIDI Splitter or the extra output on our STATUS MIDI Display.
Additional MIDI cables are available at our Store.
.:.
When creating or editing presets, connect Pilot Wave to your computer using the included USB-MIDI device.
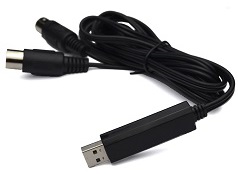
Open the Pilot Wave Preset Programmer webpage using Google Chrome and choose your MIDI Device from the pulldown list.
Note: Pilot Wave passes the data through to your effect so you can hear the changes in realtime.
When using Pilot Wave as a stand-alone pedal, the first 16 presets can be selected by holding down the TAP Button until the LEDs flash indicating the current preset.
Release the TAP Button, then use the STEP Button to cycle through the presets. Pressing the TAP Button loads the currently selected preset.
Tip: When the STEP Button is held longer than 2 seconds, the preset select cycle reverses direction.
Note: If a Tap Tempo, MIDI Clock, or One-Shot type preset is currently playing, and you select another one of those types of presets, the Pilot Wave default is for the current sequence to finish playing before the new sequence begins, which allows perfectly smooth transitions. The Cue Loop Global controls this behavior. The sequence does not finish playing when you switch to a 2-Step or 1-Step preset.
The number of presets selectable on the pedal can be limited by changing the Global Max. Preset value. Once Pilot Wave reaches the Max. Preset, it will return to Preset 1.
Selecting Presets Explained
.:.
When using Pilot Wave with an external MIDI controller, all 128 presets are accessible by sending MIDI Program Change messages on Pilot Wave's MIDI Channel. Connect the MIDI Out of the MIDI controller to the MIDI IN Jack on Pilot Wave.
Note: If a Tap Tempo, MIDI Clock, or One-Shot type preset is currently playing, and you select another one of those types of presets, the Pilot Wave default is for the current sequence to finish playing before the new sequence begins, which allows perfectly smooth transitions. The Cue Loop Global controls this behavior. The sequence does not finish playing when you switch to a 2-Step or 1-Step preset.
There are 10 available Pilot Wave Modes of Operation.
In 2-Step™ and 1-Step modes, sequences are manually advanced using the Step Button.
In Tap Tempo, One-Shot, and MIDI Clock modes, Pilot Wave automatically cycles through sequences.
Note: The Cue Loop and Tap Auto Play Globals determine whether new sequences wait for the previous one to finish, and whether Tap Tempo or One-Shot presets sequence start automatically when selected.
In Rebound, Rebound | Saw Up, and Rebound | Saw Down modes, Pilot Wave advances toward the end of the sequence when you press the Step Button, and retreats back to step one when you release.
Split™ mode allows unprecedented control over sequence playback with a single button.
In MIDI Control Change mode, an external MIDI controller is used to control a 1-Step sequence.
The first nine modes are selected and stored while creating Presets.
Playback Mode Demo
In 2-Step™ mode, you step through the sequence using the Step Button, but instead of advancing once each time the button is pressed, Pilot Wave advances one step when you press down, and another when you release. When the end of the sequence is reached, it starts over at the beginning.
2-Step provides a much more natural and intuitive way to play along with a live band and shifting tempo. You control the speed of the sequence rather than it controlling you.
Tip: The key to using 2-Step mode is to hold down the Step Button long enough to hear each step
During 2-Step Mode, the LEDs indicate the current sequence step.
Pressing the TAP Button resets the sequence to the first step.
Don't be a slave to Tap Tempo!
.:.
In 1-Step mode, you step through the sequence using the Step Button. Pilot Wave advances one step each time you press. When the end of the sequence is reached, it starts over at the beginning.
During 1-Step Mode, the LEDs indicate the current sequence step.
Pressing the TAP Button resets the sequence to the first step.
Tip: To change sounds during a song, use 1-Step to cycle through virtual presets.
.:.
In Tap Tempo mode, Pilot Wave continually loops through the sequence.
Tap Tempo sequences are started and stopped using the Step Button.
Note: Tap Tempo sequences start automatically when the Enable Tap Auto Play? Global is set to YES
During Tap Tempo mode, the LEDs indicate the current sequence step.
Change the tempo by tapping the Tap Button at least 2 times. The tap interval per measure will be the time between the last 2 taps. You can tap in a new tempo whether or not a sequence is playing.
Note: The maximum quarter-note tap interval is 24 bpm (2.5 seconds)
.:.
In One-Shot mode, Pilot Wave runs through the sequence once each time the Step Button is pressed.
Note: One-Shot sequences start automatically when the Enable Tap Auto Play? Global is set to YES
Pressing the Step Button while a One-Shot sequence is playing "stacks" another One-Shot. In other words, if you press the Step Button 3 times quickly, Pilot Wave will play back the One-Shot sequence 3 times in a row.
Holding the Step Button keeps the One-Shot sequence looping.
Tip: One-Shot presets are great for "laser" effects. You can also enhance your songs by triggering slower One-Shot sequences at regular intervals.
During One-Shot mode, the LEDs indicate the current sequence step.
Change tempo by pressing the Tap Button at least 2 times. The tap interval per measure will be the time between the last 2 taps. You can tap in a new tempo whether or not a sequence is playing.
Note: The maximum quarter-note tap interval is 24 bpm (2.5 seconds)
.:.
MIDI Clock is a powerful tool to remotely control Pilot Wave's timing and synchronize sequences with hundreds of other effects as well as drum machines, synthesizer sequencers, DAW's, recording software, lighting rigs, and more.
In MIDI Clock mode, Pilot Wave continually loops through the sequence in time with the incoming MIDI Clock. If there is no incoming clock, the sequence does not advance.
Note: The maximum allowable MIDI Clock speed is approximately 320 bpm
Change tempo by adjusting the MIDI Clock speed sent to Pilot Wave.
When selected, MIDI Clock sequences start automatically if MIDI Clock is present.
Manually start and stop MIDI Clock sequences by pressing the Step Button, by sending a MIDI Start or Stop command, or by stopping the flow of MIDI Clock data.
Note: These actions will always reset the MIDI Clock sequence to the first step.
Pilot Wave also responds to MIDI Continue commands, which cause the sequence to start playing from its last position.
During MIDI Clock mode, the LEDs indicate the current sequence step.
.:.
Pressing the Step Button advances toward the end of the sequence at your chosen tempo. When the sequence hits the end, it stops and waits. Releasing the button retreats back toward step one.
Change tempo by pressing the Tap Button at least 2 times. The tap interval per measure will be the time between the last 2 taps.
Tip: Press and release midway through the sequence for funky vibrato vibes!
.:.
Pressing the Step Button advances toward the end of the sequence at your chosen tempo. When the sequence hits the end, it stops and waits. Releasing the button jumps back to step one.
Change tempo by pressing the Tap Button at least 2 times. The tap interval per measure will be the time between the last 2 taps.
.:.
Pressing the Step Button jumps to the end of the sequence where Pilot Wave waits for you to release. Releasing the button retreats toward step one at your chosen tempo.
Change tempo by pressing the Tap Button at least 2 times. The tap interval per measure will be the time between the last 2 taps.
.:.
Split mode allows unprecendented control over sequence playback with a single button:
Initially pressing the Step Button advances toward the halfway point. Until it gets there, releasing the button retreats toward step one. Once the halfway point is reached, playback stops. Releasing the button then advances toward the end of the sequence. If the button is pressed during the second half, the sequence retreats toward the halfway point and stops if it reaches that point. When the sequence gets to the last step, it proceeds to step one and stops.
Note: When using an odd number of steps, the halfway point is rounded down. For example, both ten and eleven step sequences use step 5 as the halfway point.
Change tempo by pressing the Tap Button at least 2 times. The tap interval per measure will be the time between the last 2 taps.
During Split mode, the LEDs indicate the current sequence step.
.:.
Use a device that sends MIDI Control Change [CC] messages to move through 1-Step sequences.
The default controller number used by Pilot Wave is 11, which normally corresponds to an Expression Controller. You can change this Global value by adjusting Incoming CC Step Controller.
When Pilot Wave first receives an Incoming CC Step Controller value on its MIDI Receive Channel, it advances the sequence one step.
If the same CC value is received next, the sequence advances another step, and will start over at step one when it reaches the end.
If a higher CC value is received next, the sequence advances another step, and stops when it reaches the end.
If a lower CC value is received next, the sequence moves one step backward, stopping at step one.
Tip: Consider limiting the range of your MIDI expression pedal for best results
Tip: Create custom expression control curves by selecting non-linear Pilot Wave sequence intervals
Creating your own Pilot Wave presets is easy and fun with our online Pilot Wave Preset Programmer.
Editing existing presets is also simple.
Creating Sequences
Following is an explanation of the various parts of the online programmer:
To load a saved Preset (.csv) file, hit the Choose File button and load the file.
Tip: Pilot Wave presets are normally stored in the Downloads folder (windows). You can also share presets on our Forum.
To load a preset from Pilot Wave, connect the USB-MIDI Device's Input connector to the MIDI OUT Jack on Pilot Wave, select the preset number, and hit the Load from Pilot Wave button.
Note: Pilot Wave only uploads CC numbers, not pedal-specific data.
Make any changes you want and hit Send Preset.
.:.
Select the preset number to create.
The first 16 presets are accessible using Pilot Wave's buttons. Presets 17-128 can only be accessed by sending Pilot Wave a Program Change on its MIDI Channel.
.:.
Pilot Wave can send out up to five MIDI Program Changes on different channels to recall presets on your downstream pedals.
Note: Pilot Wave ALWAYS sends the current preset number on its MIDI Channel
Select the number of Program Changes to send using the pulldown.
Tip: Create "go to" presets for each of your connected pedals with our BaseLine Preset Programmer. Use Progam Changes to recall those presets so most of the parameters are where you want. This lets you save the Control Changes to sequence the parameters that make the coolest sounds.
Above each Program Change is a line for custom information. By default it says "Device [x] Info". Replace this text with information about your connected device, such as name, MIDI channel, and the program number for the BaseLine preset. That way you can use your first Pilot Wave preset as a template for more presets without having to re-enter information.
Next, use the Channel pulldown to select the MIDI Channel over which the Program Change will be sent. This must match the MIDI Receive Channel of your connected device.
Tip: Set different MIDI Receive Channels for each connected device!
Select the Program Number using the arrows, or by typing one in. Whenever you change the value, the Program Change is sent from the online Programmer to Pilot Wave and on to your downstream pedals, letting you preview the sound.
.:.
Select the type of sequence to create from the following Modes of Operation:
2-Step .:. 1-Step .:. Tap Tempo .:. MIDI Clock .:.One-Shot .:. Split™ .:. Rebound .:. Rebound | Saw Up .:. Rebound | Saw Down
.:.
Select the number of steps for your sequence using the pulldown.
Note: MIDI Clock sequences can only contain 1, 2, 3, 4, 6, 8, 12, or 16 steps. Split sequences must contain at least 4 steps. All other sequences may contain 1-16 steps.
.:.
If you select Tap Tempo, MIDI Clock, One-Shot, Split™, or one of the Rebound modes, select the number of measures in the sequence.
Note: All other Modes skip this step.
Select the number of measures you want [1-8]. Each measure lasts 1 quarter note, which also equals the time between taps. For example, if you select 2 measures, the sequence will last twice as long as the time between taps.
Note: Sixteen-step MIDI Clock sequences can only use even-numbers of sequence steps.
.:.
Use the pulldown to choose whether or not to block MIDI Clock from reaching your downstream pedals.
If you do not have an external MIDI Controller connected to Pilot Wave, ignore this step.
Note: If you have chosen to BLOCK ALL MIDI CLOCK globally, then this selection is ignored.
Tip: Some devices will automatically sync to MIDI Clock if one is present, so you may need to block MIDI Clock if you want to use an internally-stored tempo on a particular device - for example a very fast delay time.
This selection does not affect Pilot Wave's ability to sync its sequences to an incoming MIDI Clock.
.:.
Choose whether to have Tap Tempo or One-Shot sequences use the current Pilot Wave tempoor recall a stored tempo.
Selecting YES allows the tempo the remain constant even when you switch programs. Selecting NO uses the stored tempo for that preset.
.:.
When creating a Tap Tempo or One-Shot sequence, choosing NO for Use Existing Tempo? reveals the Tempo slider. This is the tempo that will be stored with your preset and is the quarter note interval.
Choose a Tempo with the slider.
Understand that the number of Sequence Measures also affects playback speed. Choosing 1 measure makes the sequence play back at the Tempo. Choosing 2 measures makes the sequence play back half as fast.
.:.
The Play Sequence Button allows you to preview a single pass through the sequence at either the Tempo or the Playback Speed.
When creating a 2-Step or 1-Step sequence, or when Use Existing Tempo? is chosen, the Playback Speed slider appears.
Select the playback speed for the sequence, then press the Play Sequence Button to preview a single pass.
Note: Playback Speed does not consider the number of measures in a sequence, but instead represents the length of time the entire sequence plays.
.:.
With all sequence types, you can preview the steps with the Scrub Sequence slider.
Dragging the slider left and right sends individual steps. The current Step Number is displayed above the slider
Note: When any parameter is modified, data for the entire step is sent, and the Scrub Sequence slider automatically moves to that step.
.:.
Pilot Wave can send out up to ten MIDI Control Changes on different channels at each sequence step.
Select the number of Control Changes to send using the pulldown.
.:.
Each control change allows you to select between either a Controller Number [CC] or Device-Specific parameter. Click the radio button to choose.
Next, use the Channel pulldown to select the MIDI Channel over which the Control Change will be sent. This must match the MIDI Receive Channel of your connected device.
Tip: Set different MIDI Receive Channels for each connected device!
.:.
If you selected CC, the Controller Number input will display.
Select the CC number of the parameter to control.
.:.
Selecting "Device-Specific" reveals three pulldown menus.
Select your Brand, then Device, then the individual Parameter to sequence.
Note: Each Parameter shows the Range within which it operates between two brackets [ ]. Keep the chosen values within this range.
If you have a MIDI-enabled pedal that is not in our Device list, please email us so we can add it!
.:.
To use the same value for every step, choose YES and a single slider appears. Choosing NO reveals a separate slider for each step.
Note: These values only get sent once when the preset is initially loaded. Some devices are slow to respond to Control Changes after receiving a Program Change. If your device does not react to a single-step CC, then make that parameter part of a BaseLine Preset.
.:.
Use the sliders to select a value for each sequence step.
Note: As you move the sliders, the CC value is passed through Pilot Wave to your downstream pedals. This lets you hear the changes in real time.
The CC number and Step number are displayed above each slider, as well as the selected Value.
Note: PIlot Wave does not send the same CC value twice in a row. For example if you create a four-step sequence with values [1= 64], [2=64], [3=127], and [4=64], then PIlot Wave will initially send step 1 at 64, then step 3 at 127, and step 4 at 64. After the first pass, Pilot Wave will only send step 3 at 127 and step 4 at 64.
.:.
When you have programmed your sequence, press the Send Preset Button. The LEDs on Pilot Wave will show a smile, indicating the preset was successfully stored.
Tip: If you have a STATUS MIDI Display connected, it will say "RCVD. PGM [xxx]"
.:.
After hitting Send Preset, a window appears asking whether you want to save your preset.
Type in a name or use the one that is automatically generated, then hit Save to Computer. The file should be saved to your Downloads folder (windows).
If you do not want to save, click the X in the top right.
.:.
To copy a preset, simply change the Preset Number and hit Send Preset. Modify the name as needed.
.:.
Step Audio's Forum has Pilot Wave presets for select MIDI-controllable pedals, including Meris, Chase Bliss, and Strymon to get you started. These are the individual presets that can be uploaded with our Quick Start page. Open them using the Preset Programmer, and feel free to modify!
Many more pedals and brands to come!
.:.
Use the online Globals Programmer to change Pilot Wave's default settings.
Connect Pilot Wave to your computer using the included USB-MIDI cable. The MIDI Out of the cable connects to the MIDI IN on Pilot Wave.
Choose your MIDI Device from the pulldown menu.
To use a saved Globals file, hit the Choose File button and load the file. Make any changes you want and hit Send Globals
If you connect the MIDI IN of the USB-MIDI Device to the MIDI OUT of Pilot Wave, you can load the current Globals settings by pressing the Load Globals from Pilot Wave button.
Pilot Wave does not require an external MIDI controller, but if you want to use one, select the MIDI Channel that matches the MIDI Send Channel of your external controller.
Pilot Wave works with any MIDI controller that sends MIDI Program Changes.
Note: Pilot Wave passes thru all incoming Program Changes, Control Changes, Pitch Bend, and SysEx data, while seamlessly merging that data with data generated internally. MIDI Clock can be filtered globally or per program. Keyboard Data can be filtered globally.
Pilot Wave's Default MIDI Channel is 15.
.:.
When selecting presets using Pilot Wave's buttons, Pilot Wave cycles through a range of presets. This Global sets the upper limit of that range. The default Preset Maximum is 16. The available range is 1-16.
Setting this to a lower number is useful if you only use a few presets and don't want to have to cycle through more than you actually use.
Note: Changing this value to a lower number does not erase your higher-numbered presets, and all presets remain available via MIDI
.:.
Pilot Wave powers on with a brief light show while sending Realtime MIDI data messages to Step Audio's STATUS MIDI Display. If you want to skip the light show, choose NO.
.:.
If a Tap Tempo or MIDI Clock type preset is currently playing, and you select another one of those types of looping presets, or a One-Shot, the Pilot Wave default is for the current sequence to finish playing before the new sequence begins, which allows smooth transitions.
When you change presets with CUE LOOP on, the current sequence will finish playing before the new one starts.
When you change presets with CUE LOOP off, the new sequence starts playing right away without finishing the old one.
Note: The sequence does not finish playing when you switch to a 2-Step or 1-Step preset
| Option | Action |
| ALWAYS | Looping sequences are always cued up |
| NEVER | Looping sequences are never cued up |
| MIDI | Only MIDI Clock presets are cued |
| TAP-ALL | |
| TAP-OLD | Only Tap Tempo and One-Shot presets that use OLD TEMPO are cued |
The Cue Loop Default setting is ALWAYS.
.:.
Pilot Wave can prevent your pedals from receiving keyboard data. Some pedals use keyboard data to set effect parameters, so the default is the pass keyboard data through Pilot Wave.
If none of your pedals use keyboard data, then turn this Global OFF.
.:.
When switching to a Tap Tempo or One-Shot preset, you can choose whether the sequencer starts automatically, or whether Pilot Wave waits until you press the Step Button.
The default setting is to have the sequence start immediately [YES].
.:.
Pilot Wave allows you to block MIDI Clock per program. If you prefer to block MIDI Clock Globally, set this to YES. If you want to selectively block MIDI Clock for individual presets, set this to NO.
Note: If Block All MIDI Clock is set to YES, then the Block Incoming Clock? selection for individual presets is ignored.
.:.
Pilot Wave's sequences can be controlled using an external MIDI Controller. To use this feature, set this number to match your external controller.
Note: The external controller must also send data on Pilot Wave's MIDI Channel
The values 0 and 32 are reserved for Bank Select and cannot be used.
.:.
Pilot Wave can send out synchronized Control Changes on Step 1 for Line 6 and other devices that use "Tap CCs" instead of MIDI Clock to set their timing.
To enable this feature, choose "YES" under Send Tap-Pulse CCs?
Set the Tap-Pulse CC Channel to match the MIDI Receive Channel on the device that will receive the Tap CC's.
Set the Tap-Pulse Controller Number to match the number that the device uses as a virtual "Tap".
Note: Line 6 and Behringer devices use CC 64. For other devices, consult your user manual.
Select the Tap-Pulse Value that the receiving device requires. This is usually 127.
Note: Tap CCs are only sent on Step 1 of the sequence and are not affected by the number of sequence measures. As such, if you need a faster Tap CC tempo, then send Tap CC values as part of a sequence on particular steps. For example, with an eight-step program, sending Tap CC values on the first and fifth steps will create a tempo that is twice the speed of the sequence.
.:.
Once you have selected the options you want, hit the Send Globals Button. Pilot Wave will confirm the Globals were received by showing a smile of LEDs.
Tip: If you have a STATUS MIDI Display connected, it will say "GLOBALS RECEIVED".
.:.
To restore Pilot Wave's factory default settings, hit the Factory Reset Button.
Note: Performing a Factory Reset erases all preset data and returns all Globals to their default values.
To check the current Preset number, press and hold the TAP Button until the LEDs flash indicating the current preset. Release the TAP Button, then press it again to exit.
Synchronize two Pilot Waves using MIDI Clock and slightly different sequences.
Use Step Audio's STATUS Display to see pending and selected Program Names.
If you are using an external MIDI controller, you can create an "empty" preset where Pilot Wave does not generate any additional MIDI data, and simply passes incoming data through to your downstream pedals by seting the number of outgoing Program Changes and Control Changes to zero. Alternately, don't send a Program Change on Pilot Wave's MIDI Channel.
Pilot Wave passes thru all incoming Program Changes, Control Changes, Pitch Bend, and SysEx data, while seamlessly merging that data with data generated internally. MIDI Clock can be filtered globally or per program. Keyboard Data can be filtered globally.
 Specifications
Pilot Wave is powered by standard "BOSS" type 9-volt DC, 2.1mm, 200mA min., tip negative power supply (sold separately). Current draw ~ 150mA.
*** Always use a separate or isolated power source ***
.:.
Pilot Wave neither uses nor passes MIDI Phantom Power.
.:.
Pilot Wave does respond to MIDI data received in the Running Status format.
.:.
4.8" (122mm) Wide x 2.9" (74mm) Deep x 2" (51mm) Tall
.:.
Road-ready MIDI Machinery™, built in Oregon, USA by Step Audio.
**All other pedal names and brands are trademarks of their respective companies which are unrelated to Step Audio.
© 2020, StepAudio. Patented. Additonal Patents Pending. All Rights Reserved.
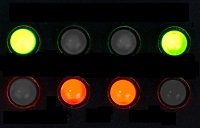 LED "smile"