Pilot Wave | MIDI Effect Sequencer | Quick Start
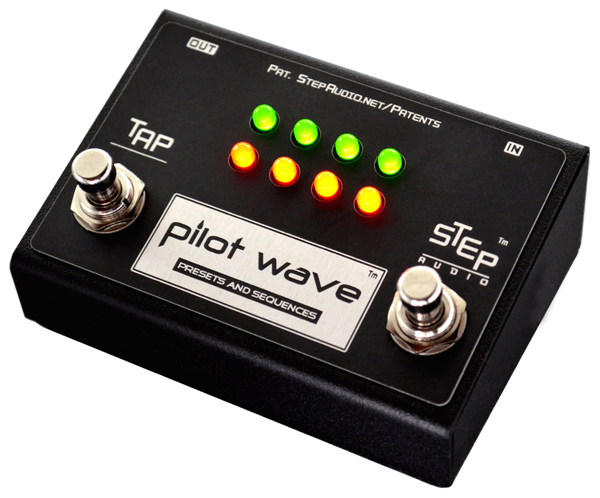
Setting up your favorite effect pedal and loading Pilot Wave™ with 16 cool presets is easy with this Quick Start interface!
[VIDEO] Loading Quick Start Presets
*** You must use the latest version of Google's Chrome Browser for this page ***
INSTRUCTIONS
Pilot Wave comes with a USB-MIDI device:
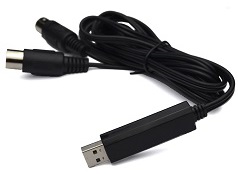
1) Connect the USB-MIDI device to your computer.
2) Connect that device's Output connector (labeled OUT) to the MIDI IN Jack on Pilot Wave.
3) Re-load this page and when it says "stepaudio.net wants to use your MIDI devices". Be sure to click "Allow".

Note: If Chrome does not find your MIDI devices, click the three vertical dots in the upper right corner and go to Settings/Privacy and Security/Site Settings, Enable MIDI Devices, then reload this page.
4) USB MIDI Interface should appear in this pulldown menu:
If you have more than one MIDI device connected to your computer, select the device that is connected to Pilot Wave.
5) Choose your brand and effect and follow the instructions.
Note: If you do not see your brand/effect, then we have not yet created 16 presets for it. You can still use our BaseLine Programmer to create a starting point for most other devices, and our Preset Programmer for any device.
6) Select Your Effect
Note: If you do not see your Effect, then we have not yet created 16 presets for it. You can still use our BaseLine Programmer to create a starting point for your presets and sequences.
6) Select Your Effect
Note: If you do not see your Effect, then we have not yet created 16 presets for it. You can still use our BaseLine Programmer to create a starting point for your presets and sequences.
Pilot Wave comes complete with 3 different MIDI cables:
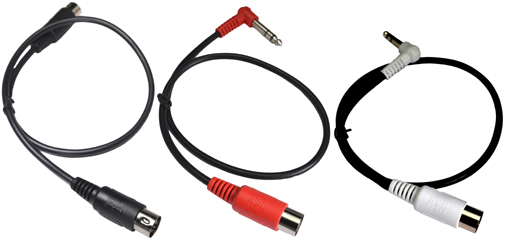
6) Use the cable with White connectors to connect the MIDI OUT on Pilot Wave to the 1/4" MIDI Jack on your Chase Bliss device.
7) Set your Chase Bliss effect to MIDI Channel 6:
First, hold down both stomp switches simultaneously when you provide power to the pedal, then let go.
Next, to send a MIDI Program Change on Channel 6.
8) Select Your Effect
Note: If you do not see your Effect, then we have not yet created 16 presets for it. You can still use our BaseLine Programmer to create a starting point for your presets and sequences.
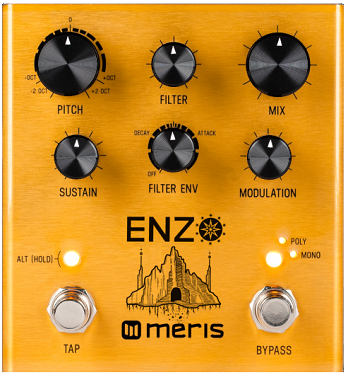
6) Configure Key Global Settings
Meris Pedal Configuration for Pilot Wave
First, with your amp off, hold down the ALT [HOLD] LED Switch while powering on your Meris pedal. Power up takes 3 seconds and all of the front panels LEDs will blink 3 times to let you know you are in Globals mode.
a) Configure EXP/MIDI Jack to work as MIDI Input
Rotate the bottom right knob all the way to the right. Only the lower of the two small LEDs will illuminate, indicating the EXP/MIDI Jack is set to MIDI.
b) Set MIDI Channel to 5
Rotate the center knob on the bottom row until only the larger LED on the right is illuminated, indicating MIDI Channel 5.
c) Enable Buffered Bypass
Rotate the top right knob all the way to the left. Only the larger LED on the left will illuminate, indicating Buffered Bypass.
Next, unplug power and plug it back in to resume normal operation with your new Global settings.
Pilot Wave comes complete with 3 different MIDI cables:
7) Use the cable with Red connectors to connect the MIDI OUT on Pilot Wave to the 1/4" EXP/MIDI Jack on your Meris device.
8) Select Your Effect
Note: If you do not see your Effect, then we have not yet created 16 presets for it. You can still use our BaseLine Programmer to create a starting point for your presets and sequences.
7) Configure Key Global Settings
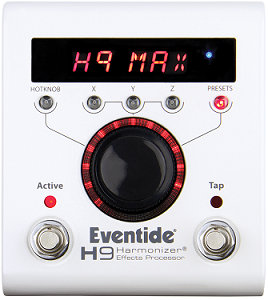
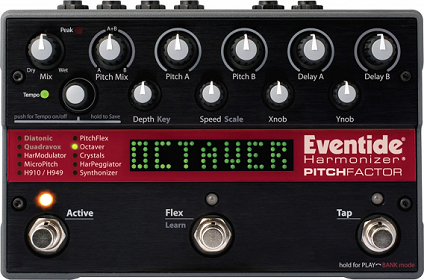
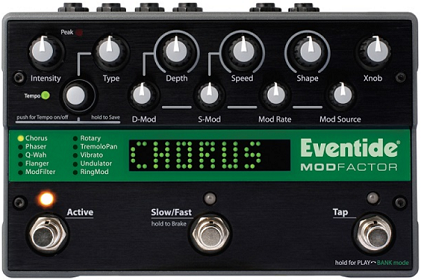
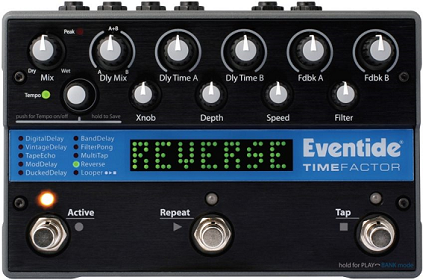
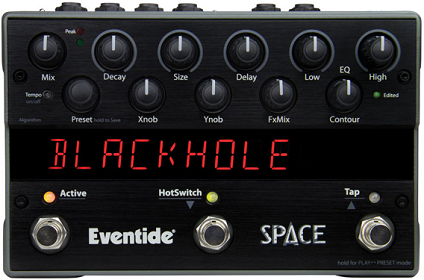
Eventide PitchFactor, TimeFactor, ModFactor and Space Configuration for Pilot Wave
Connect your "Factor" pedal to the H9 Control App, then click on "Pedal Settings".
Under the "General Settings" tab, make sure you are using the following settings:
Bypass Enabled = YES
Bypass Mode = DSP
Kill Dry Audio = NO
Global Tempo = NO
Global Mix = NO
Routing = NORMAL
Under the MIDI Settings tab, make sure you are using the following settings:
MIDI Recieve Channel = Channel 14
Then click on "Assign MIDI CC messages to pedal functions" and make sure you are using the following settings:
| Tap Tempo | MIDI CC 64 |
| Performance switch | MIDI CC 67 |
| Bypass | MIDI CC 65 |
| Activate | MIDI CC 66 |
| Left Footswitch | MIDI CC 34 |
| Middle Footswitch | MIDI CC 35 |
| Right Footswitch | MIDI CC 36 |
| Set expression pedal value (aka HotKnob value) |
MIDI CC 11 |
| Set parameter 1 | MIDI CC 22 |
| Set parameter 2 | MIDI CC 23 |
| Set parameter 3 | MIDI CC 24 |
| Set parameter 4 | MIDI CC 25 |
| Set parameter 5 | MIDI CC 26 |
| Set parameter 6 | MIDI CC 27 |
| Set parameter 7 | MIDI CC 28 |
| Set parameter 8 | MIDI CC 29 |
| Set parameter 9 | MIDI CC 30 |
| Set parameter 10 | MIDI CC 31 |
| Input Volume | MIDI CC 41 |
| Output Volume | MIDI CC 42 |
Then click on "MIDI Clock" and make sure you are using the following settings:
Enable MIDI Input Clock = NO
Enable MIDI Clock Filter = NO
Enable MIDI Output Clock = NO
Finally, set
MIDI Output Mode = Thru
Pilot Wave comes complete with 3 different MIDI cables:
8) Use the all Black cable, connect the MIDI OUT on Pilot Wave to the MIDI IN Jack on your Eventide "Factor" pedal.
9) Click and save the Presets for the Algorithms you want to sequence, then upload them to your device with the H9 Control App.
>> Be sure to keep the preset number the same so that our Quick Start Presets will work <<
Note: Some algorithms work much better for sequencing that others and are marked with **
| # | Effect | Key Parameters |
| 20 | MF Chorus | Intensity, Depth |
| 21 | MF Flanger ** | Depth |
| 22 | MF ModFilter | EXP |
| 23 | MF Phaser | EXP |
| 24 | MF Q-Wah | EXP |
| 25 | MF RingMod | Intensity, EXP |
| 26 | MF Rotary | EXP |
| 27 | MF TremoloPan | Speed |
| 28 | MF Undulator | Speed, Intensity, Depth |
| 29 | MF Vibrato | Speed and Depth |
| 30 | PF Crystals | Pitch A |
| 31 | PF Diatonic | Key of Emaj - Tap, Pitch A, Pitch B |
| 32 | PF HarModulator | Pitch A, Pitch B, Mod Depth |
| 33 | PF HarPeggiator | Not great for sequencing |
| 34 | PF H910/H949 | Pitch A, Pitch B, Feedback A, Feedback B |
| 35 | PF MicroPitch | Not great for sequencing |
| 36 | PF Octaver ** | Filter A, Filter B, Envelope |
| 37 | PF PitchFlex ** | Flex, Pitch A/B Heel, Pitch A/B Toe |
| 38 | PF Quadravox | Key of Amaj - Pitch A, B, C, D |
| 39 | PF Synthonizer ** | Flex, Voice A, Sweep B |
| 40 | Space - Blackhole | Mix, Size |
| 41 | Space - DualVerb ** | Tap, A/B Tone |
| 42 | Space - DynaVerb | Not great for sequencing |
| 43 | Space - Hall | Tap, Low-Level, High-Level, Mid-Level |
| 44 | Space - MangledVerb ** | Size |
| 45 | Space - ModEchoVerb | Tap, Decay, High-Level |
| 46 | Space - Plate | Decay, 127=Freeze, Mix, Output Level |
| 47 | Space - Reverse Reverb | Not great for sequencing |
| 48 | Space - Room | Mix, Decay - play stacatto |
| 49 | Space - Shimmer | Size, Freeze (114=Pitch) |
| 50 | Space - Spring ** | Tension |
| 51 | Space - TremoloVerb | Speed |
| 52 | TF BandDelay ** | Tap, Delay Mix, Delay A/B, Repeat |
| 53 | TF DigitalDelay | Tap, Filter, Delay Mix |
| 54 | TF DuckedDelay | Not great for sequencing |
| 55 | TF FilterPong ** | Delay Mix, Delay A/B, Filter |
| 56 | TF Looper | Record, Play, Empty |
| 57 | TF ModDelay ** | Filter, Delay Mix, Delay A/B, Feedback A/B |
| 58 | TF MultiTap | Tap, Filter, Delay Mix |
| 59 | TF Reverse | Tap, Filter |
| 60 | TF TapeEcho | Wow, Flutter, Filter |
| 61 | TF VintageDelay | Bits, Filter, Wet/Dry Mix |
10) This video explains how to start sequencing your Eventide pedals:
Creating Pilot Wave Presets for Eventide Pedals
11) We've created presets for some ModFactor algorithms. Select an algorithm.
ModFactor | Flanger | May (2-Step)11) We've created presets for some PitchFactor algorithms. Select an algorithm.
PitchFactor | PitchFlex | 16 Presets PitchFactor | Octaver | Frognosis (2-Step)11) We've created presets for some Space algorithms. Select an algorithm.
Space | DualVerb | FunHouse (Tap)11) We've created presets for some TimeFactor algorithms. Select an algorithm.
TimeFactor | BandDelay | Swirly (Tap)7) Configure Key Global Settings
Eventide H9 Configuration for Pilot Wave
Connect your H9 to the H9 Control App, then click on "Pedal Settings".
Under the "General Settings" tab, make sure you are using the following settings:
Bypass Enabled = YES
Bypass Mode = DSP
Kill Dry Audio = NO
Global Tempo = NO
Global Mix = NO
Routing = NORMAL
Under the MIDI Settings tab, make sure you are using the following settings:
MIDI Recieve Channel = Channel 14
Then click on "Assign MIDI CC messages to pedal functions" and make sure you are using the following settings:
| Tap Tempo | MIDI CC 64 |
| Performance switch | MIDI CC 67 |
| Bypass | MIDI CC 65 |
| Activate | MIDI CC 66 |
| Left Footswitch | MIDI CC 34 |
| Set expression pedal value (aka HotKnob value) |
MIDI CC 11 |
| Set parameter 1 | MIDI CC 22 |
| Set parameter 2 | MIDI CC 23 |
| Set parameter 3 | MIDI CC 24 |
| Set parameter 4 | MIDI CC 25 |
| Set parameter 5 | MIDI CC 26 |
| Set parameter 6 | MIDI CC 27 |
| Set parameter 7 | MIDI CC 28 |
| Set parameter 8 | MIDI CC 29 |
| Set parameter 9 | MIDI CC 30 |
| Set parameter 10 | MIDI CC 31 |
| Looper - Record | MIDI CC 50 |
| Looper - Play | MIDI CC 51 |
| Looper - Stop | MIDI CC 52 |
| Looper - Empty | MIDI CC 53 |
| Looper - Flip Direction | MIDI CC 54 |
| Looper - Flip Octave | MIDI CC 55 |
| Input Volume | MIDI CC 41 |
| Output Volume | MIDI CC 42 |
Then click on "MIDI Clock" and make sure you are using the following settings:
Enable MIDI Input Clock = NO
Enable MIDI Clock Filter = NO
Enable MIDI Output Clock = NO
Finally, set
MIDI Output Mode = Thru
Pilot Wave comes complete with 3 different MIDI cables:
8) Use the all Black cable, connect the MIDI OUT on Pilot Wave to the MIDI IN Jack on your Eventide "Factor" pedal.
9) Click and save the Presets for the Algorithms you want to sequence, then upload them to your device with the H9 Control App.
>> Be sure to keep the preset number the same so that our Quick Start Presets will work <<
Note: Some algorithms work much better for sequencing that others and are marked with **
| # | Effect | Key Parameters |
| 20 | MF Chorus | Intensity, Depth |
| 21 | MF Flanger ** | Depth |
| 22 | MF ModFilter | EXP |
| 23 | MF Phaser | EXP |
| 24 | MF Q-Wah | EXP |
| 25 | MF RingMod | Intensity, EXP |
| 26 | MF Rotary | EXP |
| 27 | MF TremoloPan | Speed |
| 28 | MF Undulator | Speed, Intensity, Depth |
| 29 | MF Vibrato | Speed and Depth |
| 30 | PF Crystals | Pitch A |
| 31 | PF Diatonic | Key of Emaj - Tap, Pitch A, Pitch B |
| 32 | PF HarModulator | Pitch A, Pitch B, Mod Depth |
| 33 | PF HarPeggiator | Not great for sequencing |
| 34 | PF H910/H949 | Pitch A, Pitch B, Feedback A, Feedback B |
| 35 | PF MicroPitch | Not great for sequencing |
| 36 | PF Octaver ** | Filter A, Filter B, Envelope |
| 37 | PF PitchFlex ** | Flex, Pitch A/B Heel, Pitch A/B Toe |
| 38 | PF Quadravox | Key of Amaj - Pitch A, B, C, D |
| 39 | PF Synthonizer ** | Flex, Voice A, Sweep B |
| 40 | Space - Blackhole | Mix, Size |
| 41 | Space - DualVerb ** | Tap, A/B Tone |
| 42 | Space - DynaVerb | Not great for sequencing |
| 43 | Space - Hall | Tap, Low-Level, High-Level, Mid-Level |
| 44 | Space - MangledVerb ** | Size |
| 45 | Space - ModEchoVerb | Tap, Decay, High-Level |
| 46 | Space - Plate | Decay, 127=Freeze, Mix, Output Level |
| 47 | Space - Reverse Reverb | Not great for sequencing |
| 48 | Space - Room | Mix, Decay - play stacatto |
| 49 | Space - Shimmer | Size, Freeze (114=Pitch) |
| 50 | Space - Spring ** | Tension |
| 51 | Space - TremoloVerb | Speed |
| 52 | TF BandDelay ** | Tap, Delay Mix, Delay A/B, Repeat |
| 53 | TF DigitalDelay | Tap, Filter, Delay Mix |
| 54 | TF DuckedDelay | Not great for sequencing |
| 55 | TF FilterPong ** | Delay Mix, Delay A/B, Filter |
| 56 | TF Looper | Record, Play, Empty |
| 57 | TF ModDelay ** | Filter, Delay Mix, Delay A/B, Feedback A/B |
| 58 | TF MultiTap | Tap, Filter, Delay Mix |
| 59 | TF Reverse | Tap, Filter |
| 60 | TF TapeEcho | Wow, Flutter, Filter |
| 61 | TF VintageDelay | Bits, Filter, Wet/Dry Mix |
| 62 | H9 CrushStation ** | Mids Freq., Drive, Treble |
| 63 | H9 EQ Compressor ** | Gain 1/2, Freq. 1/2 |
| 64 | H9 Harmadillo | Rate, Depth |
| 65 | H9 HotSawz | Cutoff |
| 66 | H9 PitchFuzz | Fuzz, Fuzz Tone |
| 67 | H9 Resonator | Not great for sequencing |
| 68 | H9 Sculpt | Filter-Pre, Envelope Filter |
| 69 | H9 SpaceTime | Feedback |
| 70 | H9 TriceraChorus | Not great for sequencing |
| 71 | H9 UltraTap | Taps |
10) This video explains how to start sequencing your Eventide pedals:
Creating Pilot Wave Presets for Eventide Pedals
11) We've created presets for some H9 algorithms. Select an algorithm.
PitchFactor | PitchFlex | 16 Presets H9 | CrushStation | Winter (Tap)7) Configure Key Global Settings
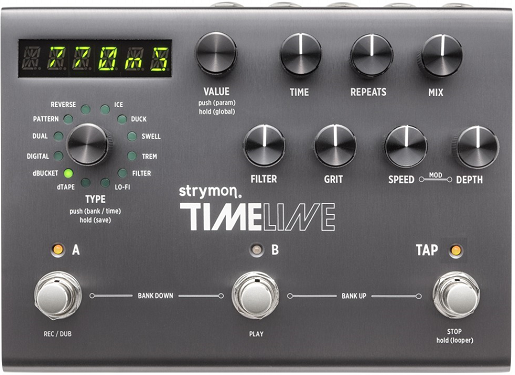
Larger Strymon Pedal Configuration for Pilot Wave
Press and hold the VALUE Knob/Button until it says "GLOBLS", then release.
a) Enable Buffered Bypass
Turn the knob right until it says "BYPASS". Press the button and turn the knob until it says "BUFBYP". Press the button again for the BYPASS screen.
b) Set MIDI Channel to 3
Turn the knob right until it says "MIDICH". Press the button and turn the knob until it says "CH 3". Press the button again for the MIDICH screen.
c) Enable MIDI Continuous Controllers
Turn the knob right until it says "MIDICT". Press the button and turn the knob until it says "ON". Press the button again for the MIDICT screen.
d) Enable MIDI Patch Change
Turn the knob right until it says "MIDIPA". Press the button and turn the knob until it says "ON". Press the button again for the MIDIPA screen.
Press and hold the VALUE Knob/Button to exit Globals mode.
Pilot Wave comes complete with 3 different MIDI cables:
8) Use the all Black cable, connect the MIDI OUT on Pilot Wave to the MIDI IN Jack on your TimeLine.
9) Store your BaseLine Preset at preset 4
First, to send MIDI Program Change number 4 on Channel 3.
Next, to send the BaseLine Preset data to your TimeLine.
Next, press and hold the TYPE Knob/Button until it says "SAVE", then release. Press and release again to store the preset.
10) Click the button below to Load Pilot Wave with 16 TimeLine Presets.
7) Configure Key Global Settings
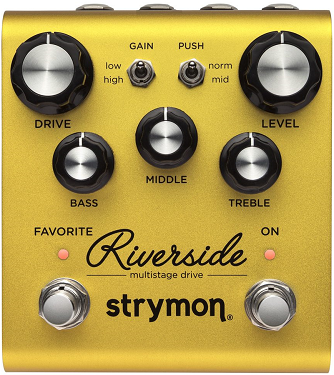
Smaller Strymon Pedal Configuration for Pilot Wave
First, turn your amp off.
Next, press and hold the FAVORITE Button while powering up the pedal. After both LEDs flash 3 times, release the footswitch.
a) Configure EXP Jack to work as MIDI Input
Turn the LEVEL Knob all the way to the right - the ON LED will turn Blue.
b) Set MIDI Output Mode to OFF
Turn the MIDDLE Knob all the way right - Both LEDs will flash Red.
Press and release the FAVORITE Button to store.
Next, press and hold the ON Button while powering up the pedal. After both LEDs flash 3 times, release the footswitch.
c) Set MIDI Channel to 3
Turn the DRIVE Knob to 2 o'clock - the FAVORITE LED will turn Red.
d) Enable Buffered Bypass
Turn the LEVEL Knob all the way to the right - the ON LED will turn Red.
Press and release the ON Button to store.
Pilot Wave comes complete with 3 different MIDI cables:
8) Use the cable with Red connectors to connect the MIDI OUT on Pilot Wave to the 1/4" EXP Jack on your Riverside.
9) to send the BaseLine Preset data to your Riverside.
10) Store your BaseLine Preset at preset 4
First, press and hold the FAVORITE Button until the LED turns blue.
Next, to send MIDI Program Change number 4 on Channel 3.
The LED will flash to let you know the BaseLine preset is stored.
11) Click the button below to Load Pilot Wave with 16 Riverside Presets.
9) to send the BaseLine Preset data to your .
10) Store your BaseLine Preset at preset 4
First, press and hold down the right stomp switch (it will change color). Keep holding and press the left stomp switch once and release, then press and HOLD it again (it will turn red). Keep holding BOTH down.
Next, to send MIDI Program Change number 4 on Channel 6.
The Middle LED will flash 4 times to let you know the BaseLine preset is stored. Release both stomp switches.
Finally, again to engage preset 4.
11) Click the button below to Load Pilot Wave with 16 Presets.
9) Store your BaseLine Preset at preset 4
First, to send MIDI Program Change number 4 on Channel 5.
Second, to send the BaseLine Preset data to your .
Third, Press and hold the ALT [HOLD] LED Switch to save your BaseLine Preset at preset 4. The ___ LED_ will flash to confirm. [DOUBLE CHECK THIS]
10) Click the button below to Load Pilot Wave with 16 Presets.
Loading Pilot Wave takes approximately 30 seconds. DO NOT unplug any devices while the presets are loading.
After each preset is loaded, Pilot Wave will show a "smile" of LEDs.
Share Pilot Wave presets on our Forum!
**All other pedal names and brands are trademarks of their respective companies which are unrelated to Step Audio.